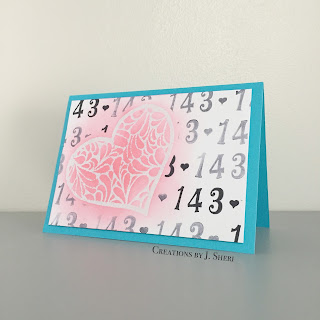
I'm back again with card #3. And the star of this episode is, once again, the burst heart design I purchased from Silhouette Design Store. Except this time I decided to make it into a rubber stamp. So, here we go!
Here are a few shots of the stamp carving process. I printed the design on plain copy paper using an inkjet printer. Because it's an abstract design I didn't have to worry about flipping the image. I used an iron to transfer the image onto the rubber. (putting wax paper between the iron and the copy paper)
Once the image was transferred enough for me to see it on the rubber, I began carving.
***BONUS*** Here's another (less expensive, less time consuming) way you can make a stamp. All you need is: craft foam, a pen, a piece of cardboard, and ink. Draw your design on the foam with a pen, and keep tracing over it, pressing firmly. Once you've made a deep impression in the foam, adhere the foam to a piece of cardboard (slightly bigger than the foam), and you're ready to stamp. This is a picture of a stamp my son made. He says it's his signature. ^_^
Carving the design took a few hours, but it was totally worth it. I couldn't have been happier with the final product.
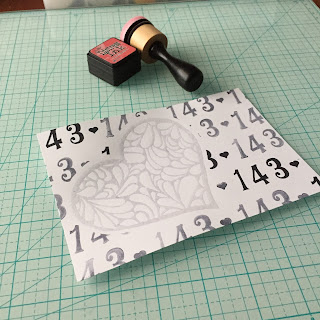
Now on to the card. I decided to take it back to the beeper/pager days. When you said, "I love you" by sending the numbers "143". (Am I showing my age with this one? (0_0) LOL) Anyway, I created a mask, slightly bigger than the heart, to cover the area I planned on stamping the heart in. Then I put the numbers 1,4,3 and a mini heart on an acrylic block, and stamped across the entire piece of cardstock. I used 2nd generation stamping on most of the paper, including a few 1st gen. stamps for a little depth.
When I finished stamping, I removed the mask, brushed the surface of the cardstock with the powder tool, and stamped the heart using a clear embossing ink pad and clear ultra high embossing power. The clear embossing powder is going to serve as a resist to the ink I will apply in the next step.
Using circular motions, I applied ink starting in the middle of the heart and worked my way out, creating a halo effect around the outside of the heart.
All that was left to do was mount it. I used craft foam the same size as the project.
And there you have it. A simple, cute way to say "I Love You".
~Jackie
Links to materials:
- Heart Design
- Stamp carving rubber
- Stamp carving knife
- White cardstock
- Number cling stamps (originally sold at Micheal's in-store)
- Mini heart cling stamp
- Embossing ink pad
- Clear embossing power
- Ink
- Craft foam
- Adhesive
- Teal cardstock


No comments:
Post a Comment