Monday, January 25

2016 Valentine's Day Card #3

Hello, hello, hello!

I'm back again with card #3. And the star of this episode is, once again, the burst heart design I purchased from Silhouette Design Store. Except this time I decided to make it into a rubber stamp. So, here we go!

Here are a few shots of the stamp carving process. I printed the design on plain copy paper using an inkjet printer. Because it's an abstract design I didn't have to worry about flipping the image. I used an iron to transfer the image onto the rubber. (putting wax paper between the iron and the copy paper)


Once the image was transferred enough for me to see it on the rubber, I began carving.


***BONUS*** Here's another (less expensive, less time consuming) way you can make a stamp. All you need is: craft foam, a pen, a piece of cardboard, and ink. Draw your design on the foam with a pen, and keep tracing over it, pressing firmly. Once you've made a deep impression in the foam, adhere the foam to a piece of cardboard (slightly bigger than the foam), and you're ready to stamp. This is a picture of a stamp my son made. He says it's his signature. ^_^


Carving the design took a few hours, but it was totally worth it. I couldn't have been happier with the final product.


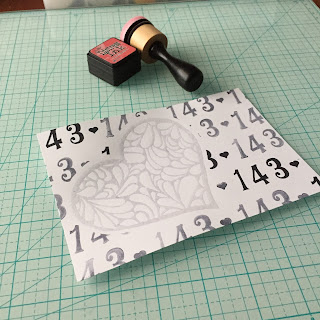
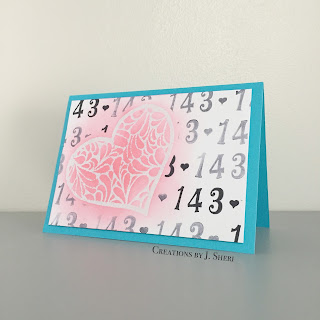
Now on to the card. I decided to take it back to the beeper/pager days. When you said, "I love you" by sending the numbers "143". (Am I showing my age with this one? (0_0) LOL) Anyway, I created a mask, slightly bigger than the heart, to cover the area I planned on stamping the heart in. Then I put the numbers 1,4,3 and a mini heart on an acrylic block, and stamped across the entire piece of cardstock. I used 2nd generation stamping on most of the paper, including a few 1st gen. stamps for a little depth.


When I finished stamping, I removed the mask, brushed the surface of the cardstock with the powder tool, and stamped the heart using a clear embossing ink pad and clear ultra high embossing power. The clear embossing powder is going to serve as a resist to the ink I will apply in the next step.


Using circular motions, I applied ink starting in the middle of the heart and worked my way out, creating a halo effect around the outside of the heart.


All that was left to do was mount it. I used craft foam the same size as the project.


And there you have it. A simple, cute way to say "I Love You".


Thanks for stopping by!

~Jackie

Links to materials:

Sunday, January 24

2016 Valentine's Day Card #2


Hi Everyone!

Since the last post, I decided to let a few ideas cook during the week, so I would have all weekend to put play them. Well, so far, I have 2.5 done... Here goes the first one!

For this card I decided to pull out the Silhouette Cameo. I used one of the designs from the design store, and cut it out of a pretty metallic soft coral cardstock.


Then, I used a cool collage style paper as the background. I fell in love with it at the store, so of course I couldn't leave it behind. And it's a good thing I didn't. It went PERFECTLY!*^_^*


To add another layer to the foreground, I decided to do faux stitching around the edge of the paper and the heart with a pen.


Because I didn't want to take away too much from the beautiful heart design and textured background, I stamped and embossed the sentiment on vellum.


Add to it a dark purple card base, and it makes all the soft pinks, blues and purples stand out.


Well, thanks for stopping by. Links to the materials I used are below. Until next time!

~Jackie 


Tuesday, January 19

2016 Valentine's Day Card #1

The first Valentine's Day card for 2016 is inspired by a YouTube video posted by Jennifer McGuire last year. In the video she used border stamps to create a super simple, yet fun card. Unfortunately, I don't have border stamps, but I do have tons of... WASHI TAPE!!! So with that, I began creating my take on the border card.

Because I'm sure I suffer from a not-so-mild case of OCD, I started by making sure the 4.5" x 6.5" white cardstock was lined up with the 30 degree mark on the cutting mat. Doing this not only helps me place the washi tape at a nice angle, but it also helps me place it as straight as possible. It not necessary, but it probably would have driven me crazy if I hadn't.

After placing the first piece of washi tape, I decided I wanted a little variation in the width of some of the washi tape. In order to do that, I pulled a piece a little longer than what I needed, and placed it on a piece of wax paper. The wax paper serves two purposes: 1) It's easy to remove washi tape from it, and 2) it's transparent enough that I can see the guidelines underneath it, so I can make sure I cut the washi tape straight.

I continued to place different washi tape on the cardstock until I reached the bottom, the I wrapped all the ends to the back.

From there, I used Ranger's jet black Archival Ink to stamp the second part of the sentiment, "YOUR STYLE", and then used an awl to put a hole big enough for the heart brad, inserted heart, and secured the fastener to the back with tape (so it won't turn).

Next, I stamped the first part of the sentiment, "LOVE". The is an outline of the word, so I used a sharpie to fill it in. The sharpies don't have the color names on them, so I'm guessing the color is Magenta. I then used Perfect Pen on top of the shapie, and covered it with Wow! Clear Gloss Ultra High embossing power.

In the next step, I masked off the washi tape section closest to the sentiment, and then applied distress ink to the top portion of the cardstock. I applied Worn Lipstick first and then Seedless Preserves.

The last step was to adhere the finished project to the card base (I used Scor-Tape because it was the first double sided tape I grabbed.), and voilĂ !

Well, I hope you enjoyed going through the process with me, and hopefully I won't get sidetracked and will post a V-Day card #2 soon.

~Jackie


Monday, January 11

Watercolor brush and glitter Gel Pen Card

After watching a YouTube video by Jennifer McGuire about brush pen, I felt like playing around with mine, so I pulled out my supplies.


Sakura of America Koi Watercolor Brush Pen, Master's Touch watercolor paper, Stampabilities Quatrefoil background stamp and black pigment ink

At first I tried Color Box black pigment ink, but it looked faded so I decided to try Stampabilities black pigment ink.


After stamping, I selected four colors, traced around the inside of each section, and then traced around the sections again using a clear Gelly Roll Stardust pen


I then spread the color out with a water brush. Once the project was dry (I'm impatient so I used a heat tool), I cut out a section of the project using a die, adhered the project to a blank card that I printed a message on, and stamped the expression "just because" inside of the cutout. 

It took awhile to complete, but I'm more than happy with the finished product. 

Well, thanks for joining me on this leg of my creative journey. Until next time!

~Jackie