Sunday, September 24

A Vintage Train Case - Adding functionality

Hello everyone,

Today I finished adding a little functionality to a Boyle train case I bought at an estate sale. I got it with the purpose of using it as a travel art case, so I felt a slight makeover was in order. Here's a picture of it unchanged with a few items I plan on keeping in it.


As you can see the inside of the lid is covered in fabric, and has a mirror held loosely by loops. As is, it didn't really serve a purpose from an art case perspective, so I let my mind mull over the possibilities. It finally settled on using it as a place to hold pencils, pens, markers, brushes, and the like. And so it began...

I ripped everything out (trim, fabric and backing), and this is what I ended up with. A fellow creative on IG told me "... it looked like a brown monster with googlie eyes and green trousers (pants)...", and I can totally see that now. 😄


Through a little adhesive trial and error, I was able to make this makeover work. The part covering the inside of the lid is a sandwich of burlap (top), Medium Weight Fuse-N-Shape (middle), and felt from an old Christmas party costume (shhh don't tell my son lol). I used the fabric and cardboard backing I removed as a templates. The burlap was cut to the size of the fabric, and the interfacing and felt were cut to the size of the cardboard. I fused everything together, sewed elastic to it (at 1/2 inch intervals), and adhered the sandwich to the inside of the lid with a liberal amount of Mod Podge for fabric.


I let that dry overnight, and then adhered a simple black box pleat taffeta trim along the top, sides and about an inch in on each side of the bottom with Aleene's Turbo Tacky Glue. I also changed the trim on the section the spans between the lid and the bottom portion of the case, adhering it with Aleene's glue. I left it open to dry overnight, and the next morning -- violá! I couldn't be more satisfied with the results. 


It's ready to withstand years to come of opening and closing, pushing and pulling, crafting/arting on the go.


I hope you enjoyed going through this little project with me. And if it inspires you, feel free to tag me on Instagram and/or Facebook, so I can enjoy, and be inspired by, how you made this little makeover your own.

Until next time!

Creatively Yours,
Jackie


Thursday, July 28

Mini House Swap

Hi Everyone!

I recently tried something for the first time -- making a mini mixed media house. I really enjoyed experimenting with different techniques, and so I figured I'd share the step by step process with you.

Enjoy!

Step 1: Cut a piece of cardboard to the desired size (I drew a rough outline with a pencil), and peel off the top layer.


This is what it looked like when I finished. Looking back I probably would have left a border on the house. You'll see why later.


Step 2: Cover the front and back with white gesso.


Step 3: select a variety of text weight (or lighter) paper. I've chosen travel themed scrapbook paper and stamps in neutrals with a pop of color here and there.


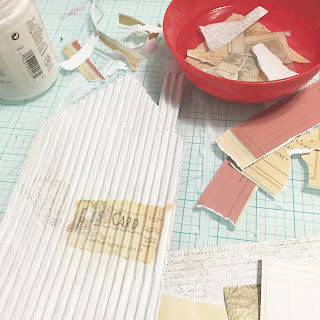
Step 4: Rip the paper and soak it in water. After it soaks for a 1-2 minutes it should be soft enough that it will mold to the creases in the cardboard. I adhered them with matte gel medium.


Here's a close up of how it looks completely covered. I can't stare at it too long or my eyes will start to cross. (>_<)


Step 5: So here's were I wish I would have a had a bit of foresight. Because I didn't leave a border when taking off the top layer the cardboard, I (1) had to create a mask, so I could apply textured paste to only the outside area. (2) had to use twice as much textured paste, because I had to fill in the valleys in preparation for the next step.


Step 6: After filling in the valleys with textured paste, I hit the whole thing with a heat tool, and then applied another layer of textured paste through a brick stencil.


Step 7: It's time to pick a few embellishments for the house. I chose a few items from the Gauche Alchemy kit (Kodak slide, cardstock tags, and the metal tag), and a couple of things I already had (canvas key tag from Michael's, and a leaf I cut with the Silhouette).


Step 8: I cut out the screen part of the metal tag, dyed it with alcohol ink, and then glued the tag to the back with Glossy Accents. I then glued the whole piece to the door area of the house with Glossy Accents


Step 9: I cut out the middle cardstock tag titled "sweet", ripped the edges, stamped "home" at the top, and wrote "home" at the bottom. I also glued this to the house using Glossy Accents.


Step 10: I covered the frame of the Kodak slide with white gesso, applied textured paste through the brick stencil, and attached it to the house with Glossy Accents. (As you can see, I love this stuff. It dries quickly and had great hold)


Step 11: I glued the leaf to the left side of the house. 

Step 12: I wrote a little story on the back:
After globetrotting, sending  post cards from distant lands, there's nothing like coming home... to find your car TPed. Oh, home, sweet, home."
Here are a few pictures of the finished project. As you can see, I wasn't paying attention, and covered part of my handwriting. oops!


Well, thanks for stopping by, and I hope you enjoyed it!

♥ Jackie
Friday, February 19

My New Toy: The Gel Printing Plate

Hi Everyone!

This past weekend I indulged in a 4-day craft-athon. It was all brought about because I was participating in a great swap on Instagram called #punchandstampswap. The creative gal who suggested the swap also suggested that the punches come from gel printed paper. Well, even though I had a 3" mini gel plate from the December Art Bento Box, I hadn't used it. Since the mini plate was a little too small for this project, I went to Hobby Lobby and picked up a 5x5" plate. I also went to GFS and picked up a box of delicatessen paper (aka deli paper) that I've been hearing so much about.

I spent the better half of a day figuring out the timing with the paint, stencil/stamp and pull dance. It just didn't seem like I was moving fast enough, but through that I learned, probably a 101 lesson, that if you put a fresh coat of paint on top of dry paint, and then pull the print, both coats come off together *light bulb*. So after many, many hours, and many many sheet of cardstock, copy paper, and deli paper, I finally pulled something that made it all worthwhile.

This was done on black cardstock with burgandy and gold paint on the first layer, and baby pink and white on the second layer. A number stamp was used on the first layer, and pieces of paper were used to create the voids in the second layer that revealed the first layer. A total winner in my book.


And then later I pulled this, and was officially hooked. The numbers is a stencil I cut with the Silhouette Cameo, and the design comes from their design store. I'll be honest, I can't remember exactly how I got this, but I know I did it in two layers. I believe, for the second layer, I laid the stencil down on top of the paint, pulled a little paint with the deli paper, and then pulled with the paper holding the first layer. Either way, I love it. *^_^*


The next day I decided I needed more stencils, so I headed back to the Silhouette Design Store. The Cameo cut through the Grafix and Simply Stencil stencil paper beautifully, and both performed like champs during my craft-athon.
By the end of day-2 I had made around 20 different prints (on 5x5" paper), and from those I got about 90 punches. Just enough to send to out for the IG swap. 


After I got the punches out of the way, I still had to make tags for two IG swap friends. I got so caught up in making those two, I decided to make a third one. The tags were highly influenced by the swap theme: For all of the the tags, the background is deli paper I used to roll off paint from the gel plate; The first and second tag have stamped images that I cut out and colored with Distress Ink; and the third tag has circle paper punches (one was stamped and the other stamped and embossed). Also, for the first time, I got to play with the Tim Holtz dies. I love the dimension they add to the tags. They were worth every penny.


Theme: Found Poetry


Theme: Found Poetry

I think I almost went blind cutting the butterflies out. >_<

All of this is a prime example of why I love being on Instagram. I've been able to find a lot inspirational creative souls. It's the best. 

Well, that's it for now, but I can guarantee you'll be seeing more gel printing from me in the near future. Until next time!

~Jackie

Monday, January 25

2016 Valentine's Day Card #3

Hello, hello, hello!

I'm back again with card #3. And the star of this episode is, once again, the burst heart design I purchased from Silhouette Design Store. Except this time I decided to make it into a rubber stamp. So, here we go!

Here are a few shots of the stamp carving process. I printed the design on plain copy paper using an inkjet printer. Because it's an abstract design I didn't have to worry about flipping the image. I used an iron to transfer the image onto the rubber. (putting wax paper between the iron and the copy paper)


Once the image was transferred enough for me to see it on the rubber, I began carving.


***BONUS*** Here's another (less expensive, less time consuming) way you can make a stamp. All you need is: craft foam, a pen, a piece of cardboard, and ink. Draw your design on the foam with a pen, and keep tracing over it, pressing firmly. Once you've made a deep impression in the foam, adhere the foam to a piece of cardboard (slightly bigger than the foam), and you're ready to stamp. This is a picture of a stamp my son made. He says it's his signature. ^_^


Carving the design took a few hours, but it was totally worth it. I couldn't have been happier with the final product.


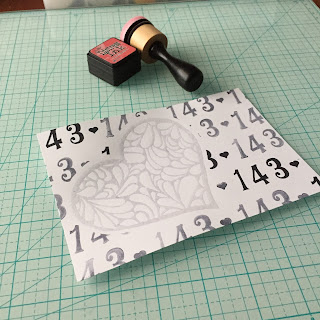
Now on to the card. I decided to take it back to the beeper/pager days. When you said, "I love you" by sending the numbers "143". (Am I showing my age with this one? (0_0) LOL) Anyway, I created a mask, slightly bigger than the heart, to cover the area I planned on stamping the heart in. Then I put the numbers 1,4,3 and a mini heart on an acrylic block, and stamped across the entire piece of cardstock. I used 2nd generation stamping on most of the paper, including a few 1st gen. stamps for a little depth.


When I finished stamping, I removed the mask, brushed the surface of the cardstock with the powder tool, and stamped the heart using a clear embossing ink pad and clear ultra high embossing power. The clear embossing powder is going to serve as a resist to the ink I will apply in the next step.


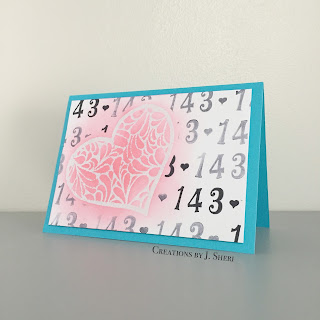
Using circular motions, I applied ink starting in the middle of the heart and worked my way out, creating a halo effect around the outside of the heart.


All that was left to do was mount it. I used craft foam the same size as the project.


And there you have it. A simple, cute way to say "I Love You".


Thanks for stopping by!

~Jackie
Links to materials:

Sunday, January 24

2016 Valentine's Day Card #2


Hi Everyone!

Since the last post, I decided to let a few ideas cook during the week, so I would have all weekend to put play them. Well, so far, I have 2.5 done... Here goes the first one!

For this card I decided to pull out the Silhouette Cameo. I used one of the designs from the design store, and cut it out of a pretty metallic soft coral cardstock.


Then, I used a cool collage style paper as the background. I fell in love with it at the store, so of course I couldn't leave it behind. And it's a good thing I didn't. It went PERFECTLY!*^_^*


To add another layer to the foreground, I decided to do faux stitching around the edge of the paper and the heart with a pen.


Because I didn't want to take away too much from the beautiful heart design and textured background, I stamped and embossed the sentiment on vellum.


Add to it a dark purple card base, and it makes all the soft pinks, blues and purples stand out.


Well, thanks for stopping by. Links to the materials I used are below. Until next time!

~Jackie 


Tuesday, January 19

2016 Valentine's Day Card #1

The first Valentine's Day card for 2016 is inspired by a YouTube video posted by Jennifer McGuire last year. In the video she used border stamps to create a super simple, yet fun card. Unfortunately, I don't have border stamps, but I do have tons of... WASHI TAPE!!! So with that, I began creating my take on the border card.

Because I'm sure I suffer from a not-so-mild case of OCD, I started by making sure the 4.5" x 6.5" white cardstock was lined up with the 30 degree mark on the cutting mat. Doing this not only helps me place the washi tape at a nice angle, but it also helps me place it as straight as possible. It not necessary, but it probably would have driven me crazy if I hadn't.

After placing the first piece of washi tape, I decided I wanted a little variation in the width of some of the washi tape. In order to do that, I pulled a piece a little longer than what I needed, and placed it on a piece of wax paper. The wax paper serves two purposes: 1) It's easy to remove washi tape from it, and 2) it's transparent enough that I can see the guidelines underneath it, so I can make sure I cut the washi tape straight.

I continued to place different washi tape on the cardstock until I reached the bottom, the I wrapped all the ends to the back.

From there, I used Ranger's jet black Archival Ink to stamp the second part of the sentiment, "YOUR STYLE", and then used an awl to put a hole big enough for the heart brad, inserted heart, and secured the fastener to the back with tape (so it won't turn).

Next, I stamped the first part of the sentiment, "LOVE". The is an outline of the word, so I used a sharpie to fill it in. The sharpies don't have the color names on them, so I'm guessing the color is Magenta. I then used Perfect Pen on top of the shapie, and covered it with Wow! Clear Gloss Ultra High embossing power.

In the next step, I masked off the washi tape section closest to the sentiment, and then applied distress ink to the top portion of the cardstock. I applied Worn Lipstick first and then Seedless Preserves.

The last step was to adhere the finished project to the card base (I used Scor-Tape because it was the first double sided tape I grabbed.), and voilà!

Well, I hope you enjoyed going through the process with me, and hopefully I won't get sidetracked and will post a V-Day card #2 soon.

~Jackie


Monday, January 11

Watercolor brush and glitter Gel Pen Card

After watching a YouTube video by Jennifer McGuire about brush pen, I felt like playing around with mine, so I pulled out my supplies.


Sakura of America Koi Watercolor Brush Pen, Master's Touch watercolor paper, Stampabilities Quatrefoil background stamp and black pigment ink

At first I tried Color Box black pigment ink, but it looked faded so I decided to try Stampabilities black pigment ink.


After stamping, I selected four colors, traced around the inside of each section, and then traced around the sections again using a clear Gelly Roll Stardust pen


I then spread the color out with a water brush. Once the project was dry (I'm impatient so I used a heat tool), I cut out a section of the project using a die, adhered the project to a blank card that I printed a message on, and stamped the expression "just because" inside of the cutout. 

It took awhile to complete, but I'm more than happy with the finished product. 

Well, thanks for joining me on this leg of my creative journey. Until next time!

~Jackie